If you’ve ever struggled with printing bookmarks at home, dealing with ink, cardstock, alignment, or cutting machines, this is a much simpler approach. Instead of printing anything myself, I ordered my designs as postcards and then turned them into finished bookmarks. No printer ink, no Cricut setup, and no wasted materials trying to get everything lined up perfectly. Let’s get started!
Some of the links in this post may be affiliate links – That means I may earn a small commission if you purchase through them at no extra cost to you.
In this tutorial, I’m going to show you how I created multiple bookmark styles from printed postcards, including:
Flat bookmarks
Laminated bookmarks
Tassel bookmarks
Magnetic bookmarks
This is a practical, efficient workflow that still gives you a polished, finished result.
Why Use Postcards Instead of Printing at Home?
Before we get into the steps, let’s talk about why this method works so well.
When you print bookmarks at home, you’re usually dealing with:
Ink costs
Cardstock quality
Print alignment issues
Cutting accuracy
Machine setup time
By ordering postcards instead, you eliminate all of that.
Everything arrives:
Professionally printed
Pre-sized
Double-sided (if you choose)
Ready to cut and finish
This shifts the process from production to finishing, which is faster and more scalable.
Materials You’ll Need
For this project, you don’t need much:
That’s it. No printer, no cutting machine required.
I walk you through the full process in my video below:
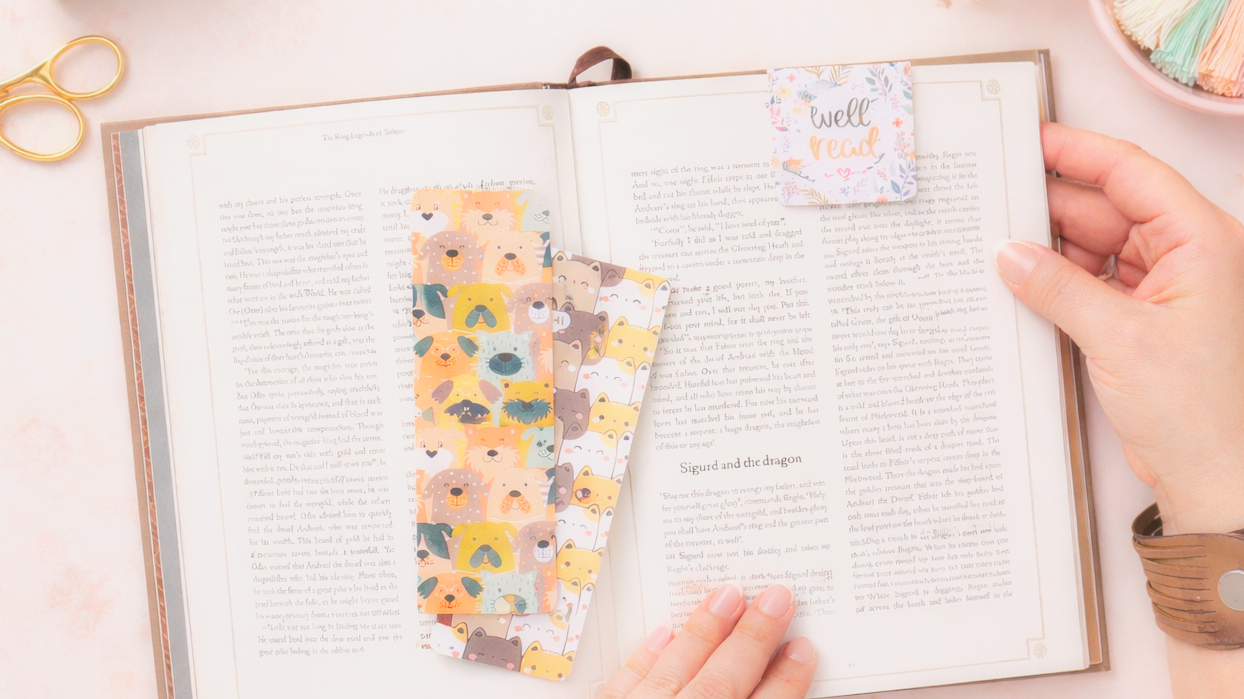
Step 1: Cutting Flat Bookmarks
To start, I created a postcard layout that allows me to get two bookmarks per postcard.
Once your postcards arrive, the process is simple:
Use a paper trimmer to cut the postcard in half
Trim edges if needed for clean lines
Round the corners (optional but recommended)
That’s your base bookmark.
As mentioned in the video, once they’re cut:
“All we need to do now that they’re printed is just cut them and trim the sides.”
At this stage, your bookmarks are already usable.
Step 2: Reading Log (Pre-Printed)
One of the features I added to my bookmarks was a reading log on the back.
This was designed ahead of time and printed directly onto the postcards, so there’s nothing to add here during the finishing process.
Each bookmark includes space for:
This makes the bookmark functional, not just decorative.
Step 3: Optional Laminate Upgrade
If you want to increase durability, you can laminate the front of the bookmark. Important: Only laminate the front so the back remains writable.
How to laminate:
Cut a piece of self-adhesive laminate slightly larger than your bookmark
Apply it to the front
Trim excess edges
Round corners again if needed
As shown in the process:
“You’d only want to laminate the front because you want to be able to write on the back.”
This adds:
Water resistance
Durability
A more polished finish
You can use:
Clear laminate
Holographic laminate (for variation)
Step 4: Adding Tassels
To take your bookmarks a step further, you can add tassels.
How to do it:
Punch a hole at the top of the bookmark
Attach a tassel
You have two options:
Make your own with embroidery floss
Use pre-made tassels
As noted:
“It really just depends on how much labor you want to put into these bookmarks and also how you want to keep your costs down.”
This step is optional, but it adds:
Visual appeal
A more finished product
Higher perceived value
Step 5: Magnetic Bookmarks (3 per Postcard)
For the second design, I created a layout that allows for three bookmarks per postcard. These are used to create magnetic bookmarks.
Step-by-step:
1. Cut into thirds
Use your paper trimmer to divide the postcard into three equal sections.
2. Score and fold
Score at the center (2 inches for a 4-inch piece)
Fold cleanly
You can use a scoring board, or simply fold and crease by hand.
3. Round corners
This keeps the look consistent and finished.
4. Add magnets
Use small self-adhesive magnets.
Important tip:
“You want to make sure that they attract before you put them on your bookmark.”
Place magnets:
Slightly below the fold
Not directly on the edge
Then press together.
Why Magnetic Bookmarks Work Well
Magnetic bookmarks are:
Functional (they stay in place)
Compact
Easy to produce in batches
From one postcard, you get:
3 individual bookmarks
Option to sell individually or as a set
As mentioned:
“With one postcard, I was able to get three magnetic bookmarks that I can sell individually or I can put them all on one card and sell them as a set.”
Cost and Efficiency Breakdown
This method is efficient for a few reasons:
1. No material waste
You’re not testing prints or throwing away misaligned sheets.
2. No equipment setup
No need to load machines, adjust settings, or troubleshoot.
3. Batch production
You can quickly cut and assemble multiple bookmarks at once.
4. Flexible output
From the same starting point, you can create:
Basic bookmarks
Upgraded versions
Magnetic sets
Ways to Use These Bookmarks
These bookmarks can be used in several ways:
Personal use
Gifts
Freebies with orders
Giveaways
Retail products
You can also package them with:
Simple cardstock backers
Stamped branding
Hanging tags
This approach is about working smarter, not harder.
Instead of focusing on printing and cutting, you’re focusing on:
Finishing
Presentation
Efficiency
As shared in the video:
“You saw how quickly it was for me to create these bookmarks without ever having to print anything myself or to set up a Cricut.”
That’s the real advantage here.
Which One Is Your Favorite?
There are multiple ways to approach this depending on your goal:
Keep it simple → flat bookmarks
Add durability → laminate
Add style → tassels
Add function → magnetic bookmarks
Personally, the magnetic bookmarks stand out the most, they’re practical and quick to produce.
If you try this method, let me know which version you prefer. And if you’re looking for a more efficient way to create finished products without the extra setup, this is definitely one worth trying.