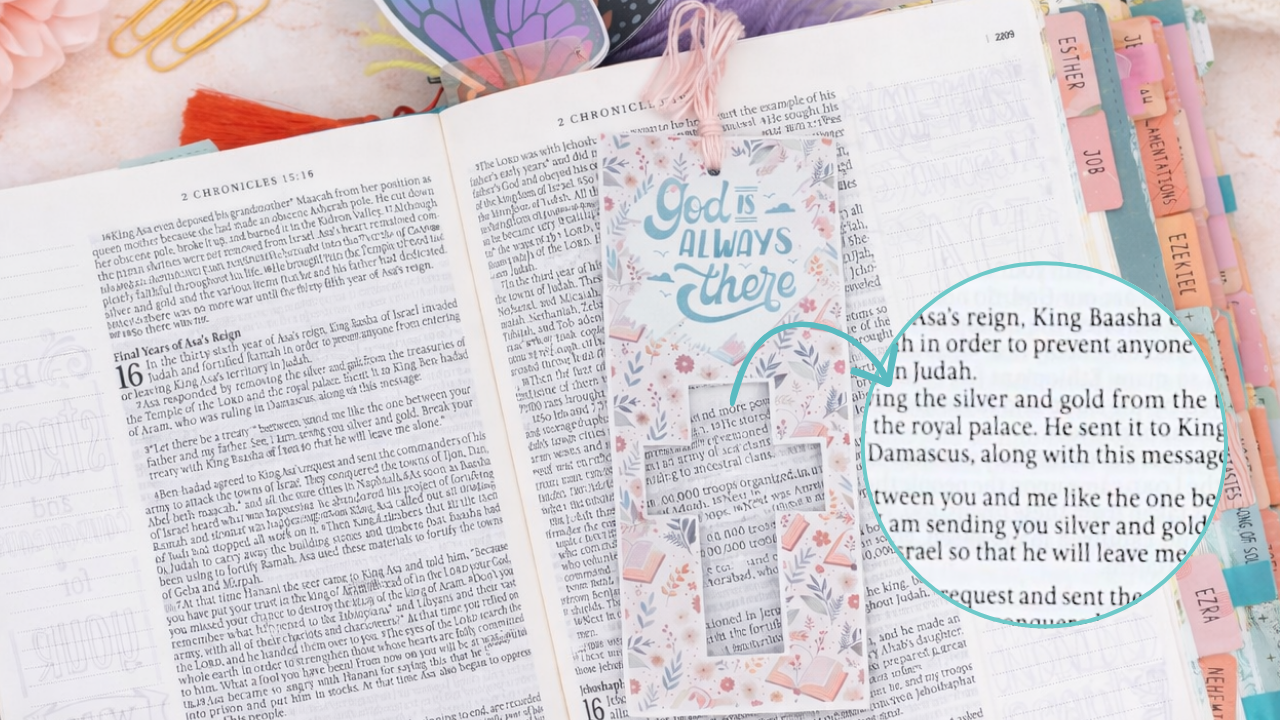
If you love creating projects that are both beautiful and functional, this DIY magnifying bookmark is one you need to try. This isn’t just a decorative bookmark, it actually magnifies text, making it perfect for Bible journaling, planners, or reading small print more comfortably. Using your Cricut and the Print Then Cut feature, you can create a custom bookmark that looks great and serves a real purpose. Let’s get started!
Some of the links in this post may be affiliate links – That means I may earn a small commission if you purchase through them at no extra cost to you. I only recommend products I personally use in my projects.
In this step-by-step tutorial, I’ll walk you through exactly how to make your own magnifying bookmark, plus share tips to get clean cuts and professional results.
Why You’ll Love This Project
This project hits that sweet spot between creative and useful.
Helps magnify small text while reading
Makes a thoughtful handmade gift
Easy to customize with different designs
Great for using Print Then Cut in a practical way
And once you make one, you’ll start thinking of all the different variations you can create.
Supplies You’ll Need
See the video tutorial below:
Step 1: Upload Your Design in Cricut Design Space
Start by opening Cricut Design Space and uploading your bookmark image.
If you’re using my design, you can grab it when you sign up for my Studio Letter at the end of this tutorial. Once uploaded, you’ll need to clean it up before cutting.
When removing the background, you may notice rough or jagged edges. Lower the color tolerance to 1 before clicking the background area of the cross. This gives you a much cleaner edge and results in a more polished finished bookmark.
Preview your cut image to make sure everything looks smooth, then continue and select Flat Graphic before inserting it into your canvas.
Step 2: Resize and Add Tassel Hole
Once your design is on the canvas, resize it to 2.5 inches wide.
Next, add a small circle at the top for your tassel. Use a 0.25 inch circle and center it horizontally.
Select both the bookmark and the circle, then click Slice to cut out the hole. Delete the extra pieces and keep the bookmark with the hole.
Step 3: Add Offset and Prepare for Print Then Cut
To create a clean edge around your bookmark:
Add an offset layer
Change the offset color to white
Select everything and click Flatten
Flattening ensures your Cricut only cuts the outer shape instead of each individual element.
You can fit about three bookmarks on one 8.5″ x 11″ page, depending on spacing.
Step 4: Print Your Design
Send your design to your printer using high-quality settings and premium photo or glossy paper.
Using photo cardstock helps give your bookmark a more professional, durable feel.
Step 5: Apply Laminate Before Cutting
Before placing your design on your Cricut mat, apply a self-adhesive laminate sheet over the printed page.
This step protects the ink, adds durability, and gives your bookmark a polished finish.
To apply smoothly, use a felt-covered tool to press out air bubbles.
Applying laminate before cutting ensures your Cricut reads the registration marks correctly.
Step 6: Cut with Cricut
Place your laminated sheet on a light grip mat, making sure the page is aligned with the grid lines.
Use a brayer to press the sheet firmly onto the mat.
Set your material to Heavy Cardstock.
Your Cricut will scan the registration marks and cut around your design.
If you have trouble with Print Then Cut, you can read my full guide here: Print Then Cut Guide
Step 7: Remove and Prepare Layers
Once cutting is complete, gently bend the mat away from the bookmark and carefully remove each piece.
You should now have two identical bookmark pieces with the hole cut out.
Step 8: Add Adhesive
Run each piece through your Xyron Creative Station to apply adhesive to the back.
This creates a clean, even layer of adhesive and makes assembly much easier.
Peel off the backing from one piece.
Step 9: Insert the Magnifying Lens
Take your credit card sized magnifying lens and place it face down over the design.
Make sure it fully covers the area you want magnified and is centered properly.
Then carefully place the second bookmark layer on top, aligning the edges as closely as possible.
This creates a sealed, double-sided bookmark with the magnifier inside.
Step 10: Add the Tassel
Cut a piece of embroidery floss and create a simple tassel.
Thread it through the hole at the top and trim to your desired length.
Step 11: Test Your Bookmark
Place your bookmark over text and you’ll see the magnifying lens enlarge the words underneath.
You can use it vertically or horizontally, and since it’s double-sided, it works both ways.
Tips for Best Results
Use high-quality print settings for sharper designs
Apply laminate slowly to avoid bubbles
Make sure your lens is centered before sealing
Use a brayer for better mat adhesion
Always flatten before Print Then Cut
Creative Variations to Try
Once you’ve made one, you can easily expand this idea:
Different shapes and themes
Personalized bookmarks
Planner accessories
Gifts for teachers, readers, or church groups
This is a great project to build on if you want to create more functional crafts.
This DIY magnifying bookmark is a simple project with a big payoff. It’s easy to make and adds a functional element that makes it stand out from typical bookmarks. Get my design below:
If you try this project, I’d love to hear how it turned out!